Monday 10 February 2014

Back painting and posting!

Well it's been a while hasn't it?  I ran out of enthusiasm for writing blogposts late last year, my enthusiasm for the hobby was still there, but my painting was infrequent, and gaming was pretty much restricted to board games (Zombiecide, Descent) and Star Wars: X-Wing.  Work was stressful and painting, my usual stress relief, just didn't appeal very much.

Thankfully, a combination of The Desolation of Smaug and a fantastic 2 weeks off at Christmas brought my mojo back.  I've been painting regularly for the last month or so (as you'll have seen if you follow me on Twitter), and with the enthusiasm for that back it seemed like a good time to get posting here again.

You may remember, around the middle of the last year I picked up a couple of Reaper Bones models  (I did a review of a Bones Dwarf for the last ever issue of the Ancible).  As a quick recap, the Ogre was pretty much fine, but Michelle the Ranger suffered quite badly from the problems inherent to the plastic Reaper uses.  Jeff over at Pirate Viking Painting has done a review of the Bones models too and we have come to similar conclusions:
  • The material is too pliable, particularly sword blades, spears, etc which can be incorrectly curved straight out of the packet and require patient fixing
  • Mold lines are a bugger to remove, sanding chews the plastic, scraping doesn't work, and by carving you are in serious danger of removing detail.
Bikkul the Ogre

The Ogre is a pre-kickstarter model.  As it's a larger model, it doesn't suffer from the detail blurring that comes with casting in the softer plastic.  This is a proper quick and dirty paint job - all the base coats were done at once, and then the entire model was washed with Agrax Earthshade.  Each element received two highlights and I added some dirt and rust.


This approach works really well when speed is of the essence (which is what the Bones models are all about), and particularly if you can use a ubiquitous base coat like Charadon Granite, or Dryad Bark.  The skin on the model is well defined so it made shading and highlighting a breeze.  Pretty much the rest of the model lends itself to dry-brushing highlights, which is a blessing when you want to get something done quickly.  


There's now a bit of a story behind Bikkul.  Mrs Walker and I had a few friends over for a gaming weekend, and one of our friends introduced us to the Pathfinder Role Playing Game.  In our introduction game, at the end of the quest we came up against an Ogre who had eaten our horses (I fell asleep when I was on watch and lost them), and despite getting knocked unconscious my character, a slightly evil Half Orc, managed to dispatch him.  In honour of our fallen foe the ogre became Bikkul.

All-in-all the Ogre is perfect for the Bones plastic as he's big, solid, and there's nothing thin that would bend easily.  The mold lines were OK but did require some work, hopefully they didn't show up anywhere on the model too much.  I've not stuck him on a base, but I think if I was to use him for gaming, he'd probably work better on a round 40mm base.

Michelle the Ranger


Michelle was a pain in the backside to prepare and not much more fun to paint.  The pliability of the plastic meant the swords were difficult to clean up and keep straight, and getting to the mold line down the leg underneath the cloak and body drove me to distraction.


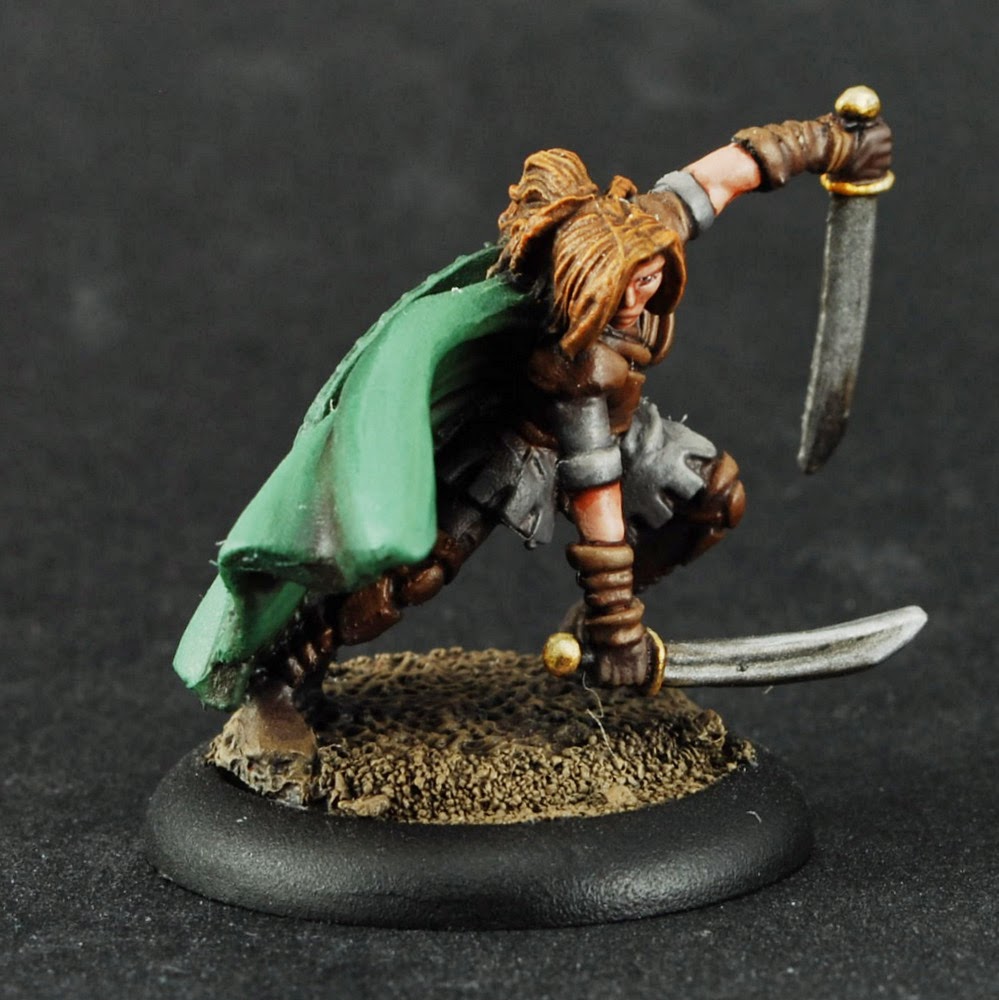
Even more painful was the mold line down the hair.  There's no way I could get rid of that cleanly, so I left it there - I'm hoping it looks like a stray hair, but even I'm not convinced...


To be honest the model just felt "wrong" from start to finish.  It was difficult to clean up, and unlike the Ogre, the paint didn't adhere to the model very well.  She was meant to be a quick paint job too, but in the end I had to try and blend the highlights as best I could.  She feels like a toy rather than a finely crafted miniature (admittedly the varnish came out shiny which hasn't helped).  Even photographing her was painful.

In  review, although the Bones models are cheap, I will be very choosy about which ones I purchase.  I would definitely recommend the Ogre, but avoid Michelle, she's not worth the pain and frustration.

I love Reaper models and I think this Sorcerer demonstrates why you're best off sticking with the metal versions...


As always, comments and criticism welcome!

Tuesday 8 October 2013

Oh what a saga...

So I had a week off last week, and while doing jobs around the house and playing my new addiction, War Thunder, on the PC I got some painting done!  First up is a Hearthguard/Hirdman/Huscarl for Saga.  After seeing the fantastic looking Saga battle board at Colours this year, some of the group have been bitten by the Saga bug, so it looks a lot like we'll be getting into it...


This chap is one of the very old Norseman from GW (which have been recast as Vikings by Wargames Foundry, so you can still buy them) and he was a blast to paint.  I had a load of these miniatures lying about unused, so I have around 1/3 to 1/2 a Viking Saga force.  He was undercoated with black spray, so that the chainmail was a simple dry-brush of Army Painter Gun Metal, followed by Army Painter Shining Silver, then a little Nuln Oil in places to accentuate the "folds" in the chainmail.  


The sword, helmet and the metal on the shield used the same paints, I just painted them on carefully with a detail brush.  At this point, I washed the whole model with very diluted Army Painter Strong Tone ink, to give the metal work a slight sepia tone.


The red on the shield and clothing was a base coat of GW Rhinox Hide blended in to the black of the undercoat, then highlighted with GW Khorne Red, and a mix of Khorne Red and GW Balor Brown.  This gives a nice earthy red, that seems to fit a viking model better.  The green is GW Death World Forest, shaded with a little diluted GW Abbadon Black, and highlighted with more and more GW Ogryn Camo.


The beard is a base of old GW Tausept Ochre and the skin was based with old GW Tallarn Flesh.  Both were washed with GW Gryphonne Sepia, then the beard was dry-brushed with the Ochre and GW Karak Stone, and the skin was neatly highlighted with the base flesh colour and P3 Ryn Flesh.

The inside of the shield was based with GW Dryad Bark, then stripes of 1:2 mix of Dryad Bark and GW Steel Legion Drab, which was then highlighted with the Drab and Karak Stone, I did this in a rough "flicky" way to emulate a little wood grain.

I'm really pleased with him, and I have more based up ready for undercoating:


In the top row are three more Hearthguard to finish up the first unit. The two identical warriors will have shields on their backs, it will just be easier to paint them without them on.  Bottom left is a Bondi (unarmoured warrior), and bottom right is the leader of the warband (name to be decided).  I've also got 4 berserkers and another Bondi in a bath of Fairy Power spray, ready to be based up and undercoated.

However it wasn't just Vikings last week.  On our last visit to Firestorm Games, I picked up the Avatars of War "Lord of Pestilence".  He's the first Avatars of War model I've purchased, and I'm really impressed.  There were mould lines, but they were easily removed, and the model went together really nicely.  There's plenty of detail, without going overboard, and the "corruption" was restricted to holes in the armour and a few exposed entrails.  I'm not a big fan of all the pus-filled boils and grunge that most people do on Nurgle miniatures, so this model really fit the bill for me.


This miniature was a joy to paint, lots of small surfaces and clearly defined edges that made blending the highlights in a particularly pleasant experience.  I decided to try something new for the green, where usually I would have gone for a GW Charadon Granite base coat, this time I base coated the entire model with GW Dryad Bark.  This was washed with diluted Nuln Oil - I made sure I covered the miniature, but avoided flooding it, which tends to leave a chalky residue if you're not careful.  For the first highlight I mixed in a little Death World Forest to the base colour and blended it in to all but the deepest recesses.  I then mixed in more and more of the Forest, blending the highlights in until the upper facing surfaces were almost pure green.  From there I mixed in more and more P3 Thrall Flesh and blended this in to the top edges.  Job done and a new(ish) way of doing green, bonus!


The skirt didn't turn out quite as well as the green did, but it's not bad, and not very well shown off by the ropey photograph.  I did a similar thing here as for the green, but used Steel Legion Drab and Rakarth Flesh instead.  For the metallics, I made sure I kept them dull and rusty, using GW Lahmian Medium (which is brilliant I have to say) mixed in with the metallic paints before application, then using some (very) old GW Chestnut Ink and dry-brushing on some of the later highlights.


The symbol on the shield is apparently a corrupted obelisk, although it looks a little like a warped cactus to me.  It was painted in the same way as the skirt first of all, before painting the chain and the hanging trophies.  I've found GW Stormvermin Fur, shaded with Agrax Earthshade and highlighted with Thrall Flesh is a good way of doing dead flesh/zombie hide, I'm going to dig out some old GW zombies to test how it works on a complete figure.  I would definitely recommend Avatars of War miniatures as alternatives to GW character models, they're around the same price, and fantastic figures.  I'll be picking up the "Champion of Pestilence" model next.

So with these guys done, I have plenty more on my plate, including the Vikings above, a group of very old Wood Elves to finish off for a friend (it's kind of a "commission", but I hate that word, so its a "painting job for a friend"), some more Britannian troopers for Dystopian Legions, Dwarves from the Hobbit boxed set, Adora Belle Dearheart for Mrs Walker, more Dropzone Commander stuff, and Empire Greatswords for a funky little Warhammer project new group member Russ Veal has planned for us.

Plus whatever distracts me next.

So not a lot then...

As always, comments and criticism welcome!

Saturday 31 August 2013

Dropping in 3: Falconry

To go along with the Sabres from last post, it's the turn of the Falcons to get some paint.  My small force needed two Falcons (they're the UCM version of present day Apache helicopters), but even two tested my batch painting skills (or lack of them).


OK not really, they were so quick and easy to paint, I got both done in an hour or so, while watching football!  They're tabletop standard with dry-brushed highlights, and like with the Sabres, the small scale, and large number of hard edges on the models means dry-brushing really does work well.  They were painted in pretty much the same way as the Sabres, so a quick recap:

Green:

  • P3 Cryx Base
  • Castellan Green
  • Death World Forest
  • P3 Thrall Flesh
Grey:

  • Eshin Grey
  • Nuln Oil
  • Codex Grey
  • Pallid Wych Flesh
Once the grey was finished, I gave the top of the model a very light dry-brush of Pallid Wych Flesh to pick out the top edges, and coloured in the insides of the engine exhausts with orange and a dot of yellow.


The last thing to do was the pilots canopy.  I wasn't a big fan of the way the Hawk Wargames guys did theirs, so I tried to go for a dark, orange lit effect.  I used a base coat of Abbadon black, then quickly blended in some Rhinox Hide, then mixed in more and more Squig Orange towards the bottom of each pane of the canopy.


After, I'd sprayed the model with Dullcote, I went back and painted the canopy (sans frame) with GW 'Ardcoat to give it the glassy look.

...and they're done.  The group of reprobates that comprise our gaming group will be at Colours in two weeks time, where I will pick up the rest of the miniatures to make up my force (or I'll buy the two person starter box if it's out, not sure which yet).  My current force list comprises:

UCM Skirmish Roster [494/500 pts]
Armored Formation [248 pts]
Sabre Squad: 3x Sabre, Condor(+Missile Pods) [152 pts]
Falcon Squad: 2x Falcon [96 pts]
Legionnaire Corps [80 pts]
Legionnaires: 2x Legionnaires, Raven A [80 pts]
Special Ordinance [166 pts]
Rapier Squad: 3x Rapier, Condor [166 pts]

This list was created using the very nice force creator app that can be downloaded from here: http://www.dzc-ffor.com/.

(Image taken from the link above)

It's really easy to use, and if you hit print, it will print out the force list, stat sheet, model listing, and a shopping list (if you remember to fill in the database of what models you already have)!  I'm a huge fan of this application and there are a few other companies that could really learn from this.

In other news, I backed the ArcWorlde Kickstarter from Warploque miniatures.  I don't usually do the Kickstarter thing (and I'm very glad I skipped the Reaper Bones one), but the miniatures really appeal to me, and it's nice to support a smaller company.

My apologies for not being active in commenting on other people's blogs, I've recently started a new job at my company, which has been a bit nuts (I guess that's what I should expect when I get promoted), and I've had a load of DIY to do, plus attending this years Fforde Ffiesta (a small literary festival dedicated to the works of Jasper Fforde).  I do however read everyone's blogs that I follow, and you are all doing some fantastic stuff, and given me a lot of inspiration to get on with my own painting.  Hopefully (he says with no confidence whatsoever), I should have some more time to both post and comment now things are starting to settle down.

I seem to recall saying that before...

As always, comments and criticism welcome!

Saturday 10 August 2013

Dropping In 2 - Dry-brush-tacular

So in my previous post, I said I wanted to paint the Dropzone Commander UCM stuff to tabletop standard, so I could get a force up and running quickly.  Usually this plan never works, and I spend way too much time on each miniature because I'm never happy with them.

This time though I may have got it sorted...


I started off with the green, as it was the biggest block of colour.  I used a base of P3 Cryx Base, applied in a couple of thin coats, making sure I didn't obscure any detail.  I didn't bother to put a wash on the green as it was dark enough already, so I moved on to the highlights.  As you can see from the pictures, to get everything done quickly I dry-brushed nearly all the highlights, going in the order:
  • Castellan Green
  • Death World Forest
  • P3 Thrall Flesh
...with lighter and lighter brush strokes as I moved through the colours.


With the green done, it was on to the grey.  I chose grey rather than a metallic colour because I think it works much better at this scale.  It's not intended to be non-metallic metal, just a "colour" rather than bare metal.  I base coated with Eshin Grey (GW had been missing a proper dark grey from their paint range for longer than I can remember), and washed with Nuln Oil, and once the wash was dry, I dry-brushed the highlights, first the old Codex Grey, and then Pallid Wych Flesh.


The last major part left were the tracks.  I used Dryad Bark for the base coat, and washed it again with Nuln Oil.  this was highlighted with Steel Legion Drab and Karak Stone, making sure I caught the bottom edges of the skirts to give the dirty/dusty look.


With 99% of the model done, I gave the top facing parts of the model a very, very light dry-brush of Pallid Wych Flesh, and picked out the lights on the "turret" base.  A quick spray of varnish and they were done!  They won't win any prizes, but they don't look bad for a quick and dirty paint job, and I'm particularly pleased with the way the muzzles of the guns look.

I've got two Falcon Gunships to do next, then it's time to buys some more...

As always, comments and criticism welcome!

Wednesday 7 August 2013

Dropping in...

It's been a little quiet on the hobby front recently, with a promotion at work, DIY, WOMAD and life in general taking up a lot of time.

So just to let everyone know that I'm still around, here's a picture of the latest project:


They're Sabre tanks from Dropzone Commander, a little bit different to your usual tank design, but they went together really well, and they're ready to be primed tomorrow, and painted over the weekend.  I'm going to try for a quick, simple tabletop standard paint scheme, so I can get an army up and playable as soon as I can.

Yeah, we'll  see how THAT goes...  ;-)